Pages

Thursday, December 16, 2010

Come over

textile patterned ornaments (3")
Fresh from the kiln~ ornaments. Right now our tree is festooned with all blue & white ornaments. It looks far more sophisticated than usual. These are decorated in the style of my new passion, Japanese textiles; like our tableware.
awww, pandas!
I made pandas too, some are chubbier than others.
latte cups with my little bird in the bottom
We still have mugs and latte cups and bowls and plates and shot glasses and and and...
restocked shelves, full of blue & white
We unloaded another firing, the last one! Like I said; come over!
Holiday Open Studio 
Saturday, December 18th, from 10-6
22017 NW Beck Road
There will be festive beverages and something sweet and something savory to nibble on. We would love to see you! 

Thursday, December 9, 2010

Holiday Open Studio

 It turned out to be a beautiful day last Saturday for our opening Holiday Open Studio.
The teeny-tiny dishes ($6) were popular
I hope you can make it for one of our remaining two Holiday Open Studios of the year; Saturday December 11th & 18th. I'll be baking yummy things to snack on and we'll have a variety of festive beverages on hand as well. 
We have unloaded three new  firings this week, so there is a plethora of new blue & white to see (latte cups are back!).
Please drop by and enjoy the coziness of the wood stove and join us for a little holiday cheer.

*if you click on "invitation to open studio events" under the "more of us" area in the right sidebar I will send you an email with details of how to find us

Wednesday, October 27, 2010

Bewilderment

sell your cleverness, buy bewilderment~ Rumi
New lobed dish (14" x 10") in the blue & white series. Bewilderment is such a great word, isn't it?
big red mushrooms are popping up on the path to the studio
We bought this huge pot in LA many years ago from a Chinese grocery store. It was out in the back alley by the trash, a disposable shipping container. I think they were amused that we would pay $5.00 for it. 
broken garden goblin and mushroom
Our garden goblin has suffered numerous tumbles, losing headdress, epaulets, and other parts of its garb. It now stands sentry at a fork in the path, nestled in fir needles and mushrooms.

Friday, October 15, 2010

a plate a day #506

dinner plate from the textile series
An unexpected honor from one of my favorite blogs, a plate a day.

black cab sessions~ the miserable rich

Monday, October 11, 2010

entry porch mural

little wren
I finished a small mural for the entry porch, more birds and leaves to match the front of the house.
new leaves
I changed the leaf design, there is more movement and grace, but they are a bit fragile prior to installation. I was careless and broke one of the  triple leaves at the stem.
pine cones
I made some smaller pieces to add another layer of interest to the birds and leaves murals.
acorns, too
The Nuthatch is still one of my favorites.
nuthatch
slot for hanging on the back
I push a nail into the clay on the back when the clay is still green to create a slot for hanging on a nail. No installation required, you can put them up anywhere.
I'm thinking of placing this one over a light switch in the hall. Two little finish nails is all it takes.

Thursday, October 7, 2010

Freedom Rangers

 We have twenty-five more chicks (freedom rangers!) to raise for meat.
They will live in the new chicken tractor with an attached fenced yard for about a month. Then, they will move to the bigger tractor that the farmer will bring over from across the road. They can free range (with a perimeter fence near the woods for coyote protection) when they are a bit bigger and reliably return to the shelter at night.
But, they are still small.
And really cute.

In Japan, it seems that everything has a great aesthetic, even manhole covers. I like the one with the deer.

Friday, October 1, 2010

little moon face with tie

 I found this while cleaning shelves in the studio.
 I don't honestly remember which of my kids made it.
But he seems to be headed toward that bucket.

amazing video of a whale

Friday, September 24, 2010

not for the squeamish, chicken "processing"

First, calm yourself, then pick up the chicken. Cradle it gently in your arms and place it in the cone.
Lightly brush back the feathers and cut the carotid artery, avoid cutting through the windpipe or nerve column. The chicken will  feel nothing, get lightheaded, and lose consciousness.  It is a humane and painless method, the birds do not squawk or thrash around.
Ready for scalding
The scalder must be at the correct temperature, 145-150 degrees f. Immerse bird for a few seconds and test by tugging on a wing feather.
Dunk again.
When the feather pulls easily, they are ready to pluck.
Place them in the chicken plucker.
Rotate at slow speed and spray with water.
Just a little longer.
Five more seconds.
No more feathers. About 90 seconds.
The feathers fall out through a gap between the plastic tub and the potter's wheel head. I washed and dried these for future art projects.
I find myself calling this "harvesting" the chickens. I will have to examine this. Hmm...

Bee sculptures

Wednesday, September 15, 2010

chicken plucker

Fatty Mcfatfat
As the time to "harvest" our Freedom Ranger chickens approached,we began to look into humane methods of slaughter. We found a good video on YouTube that was pretty persuasive, so we decided to model our process on his technique.
Meanwhile, the Farmer became impatient with some roosters that were harassing the hens, so he took a couple early on his own.
He reported that it took him 5 hours to process the two chickens, the time mainly being spent on plucking. So, we got very serious about researching chicken plucking, because the Farmer was ready to send them all to a commercial processor. Nooooo.....
After checking into renting equipment (too time consuming and costly to bother), we found plans for building your own mechanical chicken plucker. Mr. Cranky got to thinking and realized that one of our potter's wheels could be converted into a chicken plucker.
The Farmer contributed a big plastic drum~
We bought plans~
 a pre-drilled plastic plate and chicken plucker fingers from Herrick Kimball~
scrounged some scrap wood, bought a few screws and such~
and viola~
It literally takes about 60 seconds to thoroughly de-feather three birds at a time, no pin feathers left, nothing at all.
Now Mr. Cranky wants to become an itinerant chicken plucker.

Gorgeous porcelain

Friday, September 10, 2010

Hector and me

plate with birds*
Mr. Cranky and the Florist both agree that I should be leaving the centers of my plate empty.  
That creates in me an urge to scribble. So that's what Hector and I did. I like the calligraphic feeling of our scribbling.
Their argument is that people expect the center of their dinner plates to be plain to better display the food. I think that may be true in restaurants where the food is plated in very specific and possibly ornamental ways, but not at a dinner in the home. I think the vision of the table set with beautiful tableware makes for an inviting, welcoming, happy-looking table. We often experience surreptitious plate-switching before everyone sits down to eat; we all have our favorites.
Hahaha, so take that Mr. Cranky and Grumpy** Florist!

*reminds me of Cinderella and the birds helping sew her ball gown in the Disney movie
**not really

Puffball for fall

Wednesday, September 8, 2010

Slip trailers

bulb syringe
This is the first slip trailer I ever used. The familiar bulb syringe, also known as an ear syringe, but known to parents throughout America as a required part of the arsenal of tools to save your baby's life should he or she accidentally aspirate whatever s/he may be in danger of aspirating while asleep. Don't ask me; I just bought one because it seemed like a good idea at the time. It does not, by the way, make for a very good slip trailer.
commercially available slip trailer from a ceramic supply catalog
This has been my trusty slip trailing companion for many years. I also tried wash bottles from a chemical supply house here in Portland, they have wonderful tiny little tips, but I ultimately lost track of the source. They were pretty good though.
slip trailer, lady clairol version
This became the slip trailer d'jour for many years as I seemed to have an unlimited supply (hello blonde!).
electric, air-powered slip trailer
Hand fatigue led  me to try this high tec slip trailer. I pretty much hated this one after an brief love affair with not having to squeeze the slip out all the time. It is easier on the hand, but it makes a noise and clogs quite a bit.
Hector!
Meet Hector, whom I love with a mad passion. I came across a video of this while trying to find a tutorial on making a ball mill using a potter's wheel. It is a demonstration of slip trailing by Charan Sachar where he demonstrates how to make this very nifty tool. 
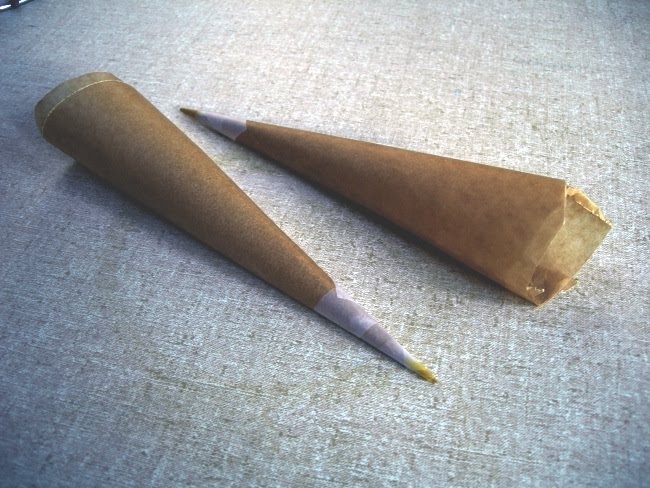
parchment paper version
I though I would be extra clever and make mine out of parchment because I found the mylar difficult to work with when forming the cones. These don't work, the paper is too porous and the slip dries out too much. They would be great for drying slip though, very effective.
mylar slip decorating cones
I was having a bit of trouble with the tips fraying in use. Mr. Cranky thought they might work better if the tips were dipped in wood glue. Here is a batch, post glue dipping, drying on a hanger.
single use only
It is not practical to reuse these, which feels wasteful but which I secretly like. Nothing like a fresh clean new slip trailer ready to go.
I can't describe how much I love these. They fit right in the palm of my hand and warm up to body temperature, feeling like an extension of my fingers. It's like having a little animate being resting in my hand, alive. I dream about it.

ama~ women of the sea.